 Free previewPhoto to line art embroideryTurn a pet, house or portrait photo into a one-color outline embroidery file in triple-run or running stitch.Open the tool
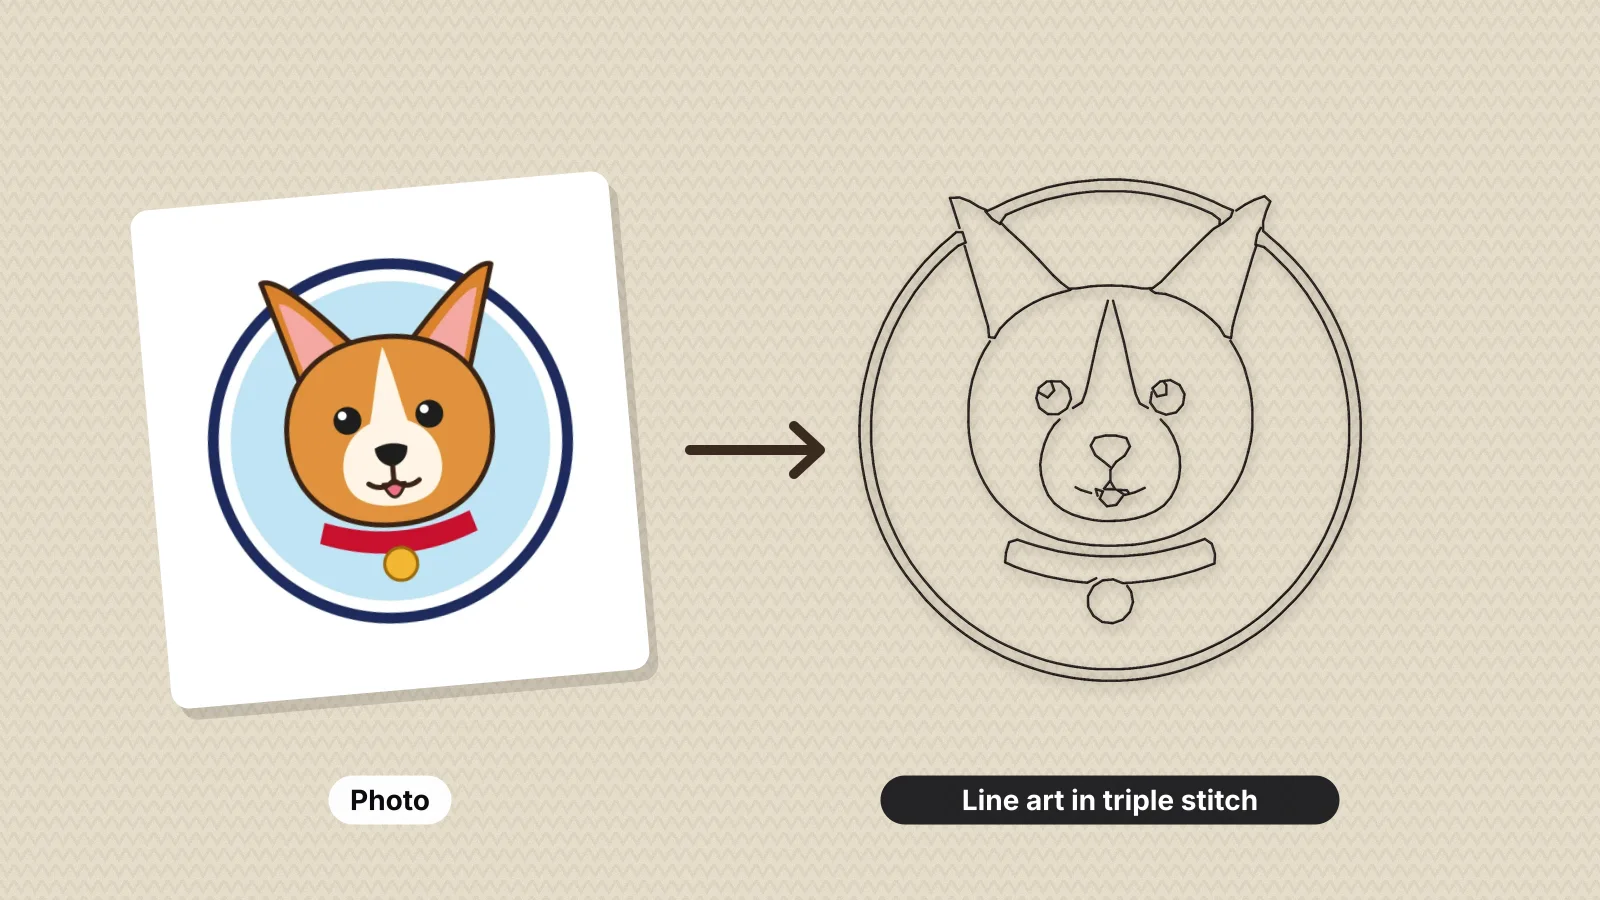
Single-color outline embroidery is everywhere: a dog's face traced in black on a sweatshirt, a first home in one thin line on a tote, a couple's wedding photo as a simple sketch. It looks hand-drawn, sews quickly and works on almost any fabric, which makes it one of the most popular custom gifts.
This guide explains how a photo becomes line art stitches, which photos convert well, sizes and thread, fabrics and stabilizer, and how line art compares with a filled pet portrait.
What line art embroidery is
Line art embroidery stitches only the outline and the key inner lines of a subject, usually in one thread color. There are no fills, so the fabric shows everywhere else. Popular subjects:
- Pets: the face, ears and markings of a dog or cat, often with the name underneath.
- Houses: a family home, a first apartment or a wedding venue.
- People: couples, families and baby profiles from a favorite photo.
- Places and things: a city skyline, a car or a favorite plant.
With so little thread, the finished piece stays soft and light, which is why line art suits sweatshirts and tees as well as totes. For more subjects, see pet embroidery ideas.
How a photo becomes line art stitches
- Edges are found. The photo is scanned for places where brightness or color changes sharply: the outline of an ear, the line of a roof, the edge of an eye.
- The lines are cleaned. Specks and short fragments are removed, small gaps are closed and wobbly edges are smoothed, so what's left reads as a drawing rather than noise.
- Lines become paths. Each line is turned into a single path along its center, the way you'd draw it with a pen.
- Paths become stitches. Each path is sewn as a running stitch or a triple stitch, and the paths are put in an order that cuts down jumps and trims.
| Stitch | How it sews | Looks like | Best for |
|---|---|---|---|
| Running stitch | One pass along the line | A fine pen line | Small designs, smooth fabrics and delicate sketches |
| Triple (bean) stitch | Each stitch sewn three times: forward, back, forward | A bold marker line | Sweatshirts, fleece, totes and designs seen from a distance |
Embrizo's photo to line art embroidery tool does all four steps from a photo and makes a running- or triple-stitch machine file. The glossary explains running stitch and bean stitch.
Try it with your own design
Sign up free, upload an image and get a stitch preview in under a minute.
Drop your image here
PNG, JPG, SVG, PDF or AI · stays on your device
Not sure what to expect? See real examples or how it works.
Choosing a photo that converts well
| Look for | Avoid | Why |
|---|---|---|
| One clear subject filling most of the frame | A small subject in a busy scene | Every edge in the background becomes a line too |
| A plain background | Patterned sofas, grass and crowds | Texture turns into hundreds of short squiggles |
| Good contrast between subject and background | A black dog on a dark rug | Outlines are found where tones change |
| Sharp focus and even light | Motion blur and harsh shadows | Shadows draw lines where there's no real edge |
| A front or three-quarter view | Extreme angles and top-down shots | The likeness is easier to read |
| The original photo, ideally 1,000 px or more across | Screenshots and thumbnails | Small images give broken, jagged lines |
Crop tight before you convert. If the subject sits on a white or solid-color background, the logo background remover can cut it out to a transparent PNG first. For houses, a straight-on photo in flat daylight works better than an angled shot at sunset.
Sizes for line art embroidery
| Item and placement | Design width | Notes |
|---|---|---|
| Left chest on a tee or sweatshirt | 75–100 mm (3–4 in) | Keep it simple: a face outline and a name |
| Center chest on a sweatshirt or hoodie | 100–175 mm (4–7 in) | The most popular spot for pet outlines |
| Tote bag | 125–200 mm (5–8 in) | Room for a whole house or a couple |
| Pillow cover | 150–250 mm (6–10 in) | Large, open designs look like a drawing |
| Baby bodysuit | 50–75 mm (2–3 in) | Only a few lines at this size |
| Cap front | 50–64 mm (2–2.5 in) tall | Only bold, simple outlines survive on a curved front |
Line detail sets the minimum size. Lines closer together than about 1.5–2 mm (0.06–0.08 in) blur into each other once stitched, so a face full of fur lines needs a bigger design than a simple silhouette. Stitch counts stay low either way: a line art design sews in a fraction of the time of a filled design the same size.
Stitch settings and thread
- Stitch length. About 2–2.5 mm for running stitch, and shorter, around 1.5 mm, on tight curves such as eyes and noses. Stitches under about 1 mm can pile up and break the thread.
- Triple stitch at about 2.5–3 mm per stitch gives a bold line that sits on top of knit and fleece instead of sinking in.
- Thread weight. Standard 40 wt polyester or rayon suits most designs. A 30 wt thread with a 90/14 needle gives a heavier line on machines that handle it; check your manual. The thread weight guide explains the numbers.
- Color. Black or charcoal on white, cream and heather gray; white or cream on navy, black and forest green; tone-on-tone for a subtle look.
- Bobbin. Use white or matching bobbin thread and check the tension. With so few stitches, any bobbin thread pulled to the top shows clearly; see why bobbin thread shows on top.
Fabrics and stabilizer
| Fabric | Stabilizer | Tips |
|---|---|---|
| Sweatshirt and hoodie fleece | Medium cut-away or no-show mesh | Triple stitch, plus water-soluble topping if the surface is textured |
| T-shirt jersey | No-show mesh, fusible if you have it | Running stitch suits thin knits; don't stretch the fabric in the hoop |
| Canvas tote | Tear-away or medium cut-away | Either stitch works; canvas holds fine lines well |
| Linen and cotton tea towels or pillows | Tear-away | Running stitch gives the most hand-drawn look |
| Denim jacket | Cut-away | Use a 90/14 needle and a bold thread color |
Line art puts few stitches into the fabric, so it puckers less than a dense design, but long lines still pull. The hoodie, T-shirt and tote bag stabilizer pages cover each one.
Making a line art file with Embrizo
- Crop the photo to the subject and remove a busy background if you can.
- Upload it to Embrizo's photo to line art embroidery tool.
- Choose running stitch for a fine line or triple stitch for a bold one, and set the finished size.
- Check the preview at that size. Every line you see will be stitched, so stray marks from the background need to go.
- Save the file in your machine's format, such as PES, JEF or DST.
Designing and previewing are free; saving the machine file needs a plan, from $8 a month billed yearly. Embrizo is the quickest way from a photo to a stitchable outline: tracing a detailed pet by hand in digitizing software takes far longer, and a digitizing service usually means waiting a day or more.
Stitching by hand instead? The photo to embroidery pattern tool turns the same kind of photo into printable line art to transfer onto fabric for backstitch or stem stitch.
Practice on a free design
167 ready-to-sew designs in every machine format, free with an account.
Line art vs a filled pet portrait
| Compared | Line art outline | Filled pet portrait |
|---|---|---|
| Look | A clean sketch in one color | Blocks of color showing markings and fur |
| Stitches | Low: mostly single lines | High: fills cover most of the area |
| Sew time | Short | Much longer at the same size |
| Feel on the garment | Soft and light | Heavier and stiffer |
| What the photo needs | Clear outlines and contrast | Clear markings and colors |
| Best for | Sweatshirts, tees, quick orders and a minimal style | Pillows, totes, keepsakes and memorials |
Line art is the better pick for wearables and for pets whose shape is the likeness. A filled portrait shows colors and markings. The pet portrait guide covers that route, and photo to embroidery explains the wider trade-offs of stitching photos.