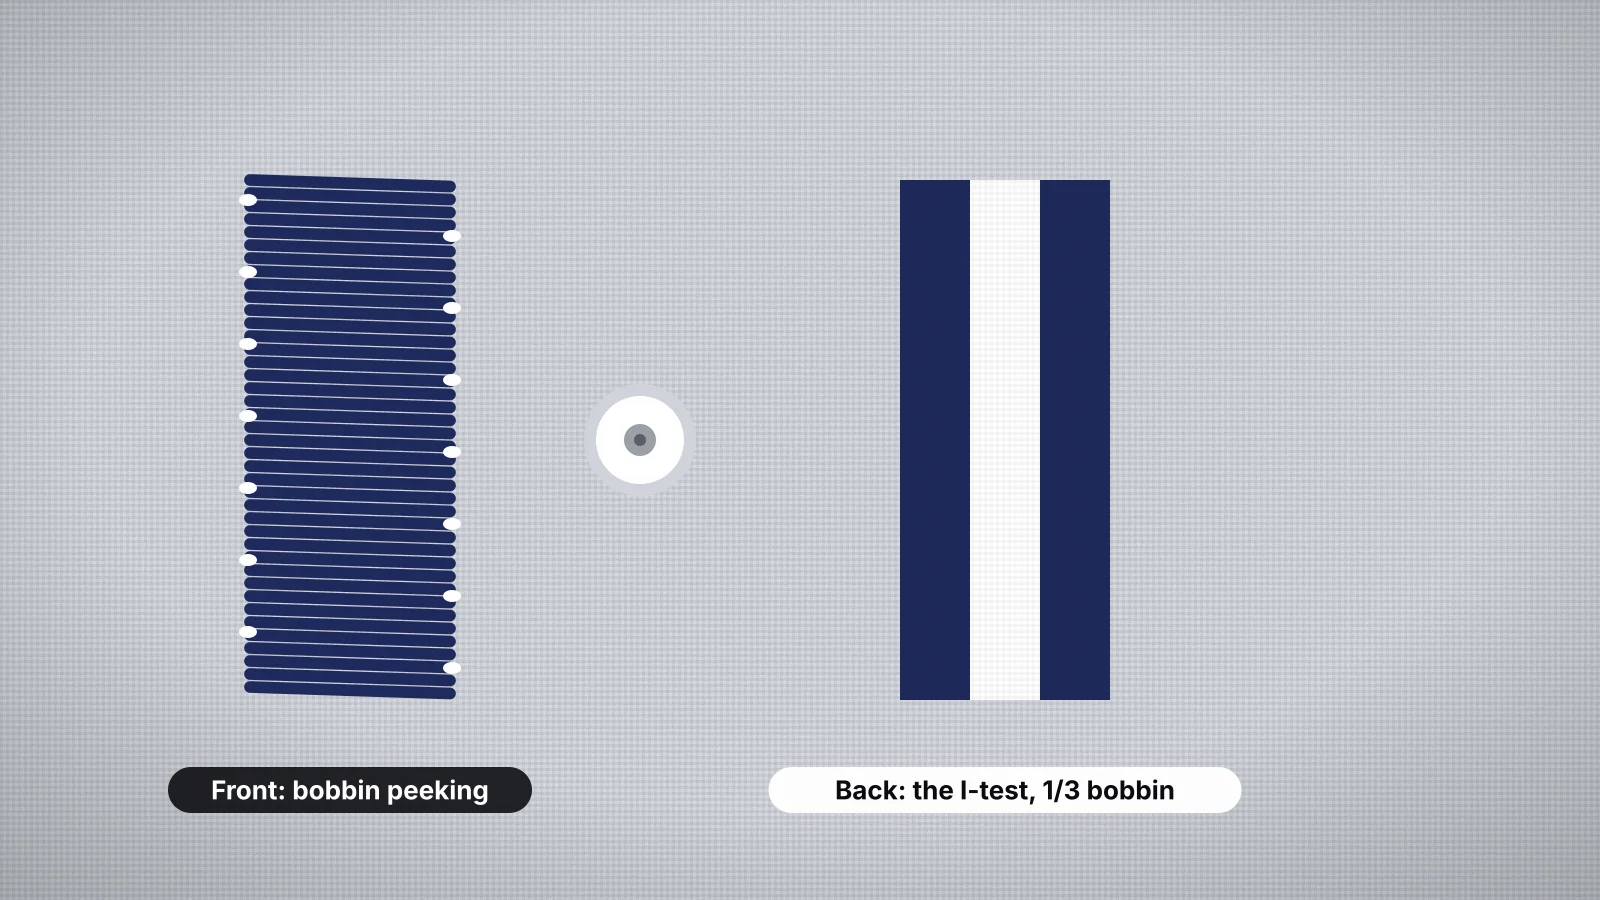
On the front of a good design you should see only top thread. When white or black bobbin thread starts showing along the edges of satin lettering, or as dots in a fill, the two threads have fallen out of balance: the top thread is winning the tug-of-war and pulling the bobbin thread up through the fabric.
It's one of the most common embroidery faults and usually one of the quickest to fix, as long as you check things in the right order. This guide explains what balanced tension looks like, then works through threading, the bobbin, the tension, the needle and the design. For thread that snaps rather than shows, see why embroidery thread keeps breaking.
What balanced embroidery tension looks like
Every stitch is a loop of top thread locked with the bobbin thread. In embroidery, that lock should sit on the back of the fabric, so the bobbin thread stays out of sight.
- Front: only top thread, with smooth satin edges and no white dots.
- Back of a satin column: bobbin thread down roughly the middle third, with top thread showing on each side. This is often called the one-third rule.
- Bobbin thread on the front, or almost no top thread on the back: the top tension is too tight for the bobbin tension.
- Top thread looping or piling up on the back: the opposite fault, top tension too loose, often because the thread missed the tension discs. How to fix bird nesting covers it.
Sew a tension test before changing anything: a few capital letters such as H or I in a satin font, about 1 in (25 mm) tall. Turn it over and read the back of the columns.
Check these in order
| Step | What to check | Why |
|---|---|---|
| 1 | Rethread the top thread with the presser foot up | Thread snagged on the spool, wrapped round the pin or caught in a guide is pulled tighter than the dial says |
| 2 | Fit a new needle of the right size | A worn, burred or too-small needle drags on the thread |
| 3 | Take out the bobbin and reseat it | A bobbin in the wrong way round, or not pulled into its tension spring, runs loose |
| 4 | Clean the bobbin area | Lint under the tension spring or in the hook stops the thread seating properly |
| 5 | Check the bobbin type and thread | The wrong bobbin size, or a loosely wound bobbin, gives uneven tension |
| 6 | Adjust the top tension | Only after the steps above, and in small steps |
| 7 | Look at the design | Dense satin and small lettering pull bobbin thread up more than open fills |
Test after each step. When the problem goes away, you've found it, and you haven't changed settings that were fine. The thread tension entry explains how the two threads balance.
Try it with your own design
Sign up free, upload an image and get a stitch preview in under a minute.
Drop your image here
PNG, JPG, WebP or SVG · stays on your device
Rethreading the top and the bobbin
- Take the top thread out completely and rethread from the spool, with the presser foot raised so the tension discs are open and the thread drops between them.
- Check the spool. Thread that catches on the spool's notch or on a cap that's too small, or that wraps round the spool pin, adds tension the dial doesn't show.
- Follow every guide, including the take-up lever and the last guide just above the needle.
- Reinsert the bobbin exactly as your manual's diagram shows, unwinding in the direction it gives, and pull the thread through the slot into the tension spring.
The threading guide walks through the whole path, top thread and bobbin.
The bobbin, its case and its thread
| Check | What to look for |
|---|---|
| Bobbin type | The size and class your manual lists. A bobbin that looks similar but is slightly different can sit loosely and run at uneven tension |
| Winding | Evenly wound, firm and not overfilled; a soft or lumpy bobbin feeds unevenly. Prewound bobbins should be a type made for your machine |
| Bobbin thread | Embroidery bobbin thread, finer than the top thread, often around 60–90 weight; top thread in the bobbin changes the balance |
| Bobbin case | Some machines come with a separate bobbin case for embroidery, often marked with a color; use the one your manual specifies, and check it for nicks |
| Lint | Brush out the bobbin area and under the tension spring regularly |
On multi-needle and commercial machines, the bobbin case has its own tension screw, and many technicians check it with a drop test or a bobbin tension gauge. Follow the maker's method, because the right setting varies by machine. The bobbin and bobbin thread entries have the basics, and the maintenance guide shows how to clean the bobbin area safely.
Adjusting the tension
- Change the top tension, not the bobbin, first. On many home embroidery machines the bobbin tension is set at the factory, and the top tension is the one you're meant to adjust.
- Loosen the top tension a little, one step or a small turn at a time, and sew the test again.
- Note where you started, so you can go back if it doesn't help.
- Leave the bobbin screw alone on a home machine unless your manual explains how to set it; small turns make a big difference.
If the top tension is already near its lowest and bobbin thread still shows, the bobbin side is probably too loose or the thread isn't seated in its spring. If reseating and cleaning don't fix it, have the machine checked.
Practice on a free design
124 ready-to-sew designs in every machine format, free with an account.


The needle, the thread and the design
- Needle: a dull or burred needle, or one too small for the thread, adds friction that acts like extra top tension. A 75/11 suits 40-weight thread on most fabrics; see the needle guide.
- Top thread: a thicker or rougher thread than usual, or metallic thread, drags more. Some embroiderers loosen the top tension slightly for metallics.
- Dense satin and small lettering: narrow satin columns stitched very close together pull hard on the bobbin thread. If bobbin shows only on the lettering, try a slightly lighter satin density, or make the letters bigger.
- Speed: slowing the machine can help on dense designs and specialty thread.
If you're making the file, the Embrizo digitizer has a satin density setting alongside fill density, and the design check flags shapes too fine for satin to sew cleanly. Digitizing and previewing are free with an account; downloading the file needs a paid plan. For other faults, the embroidery troubleshooter narrows down the cause from a couple of questions.