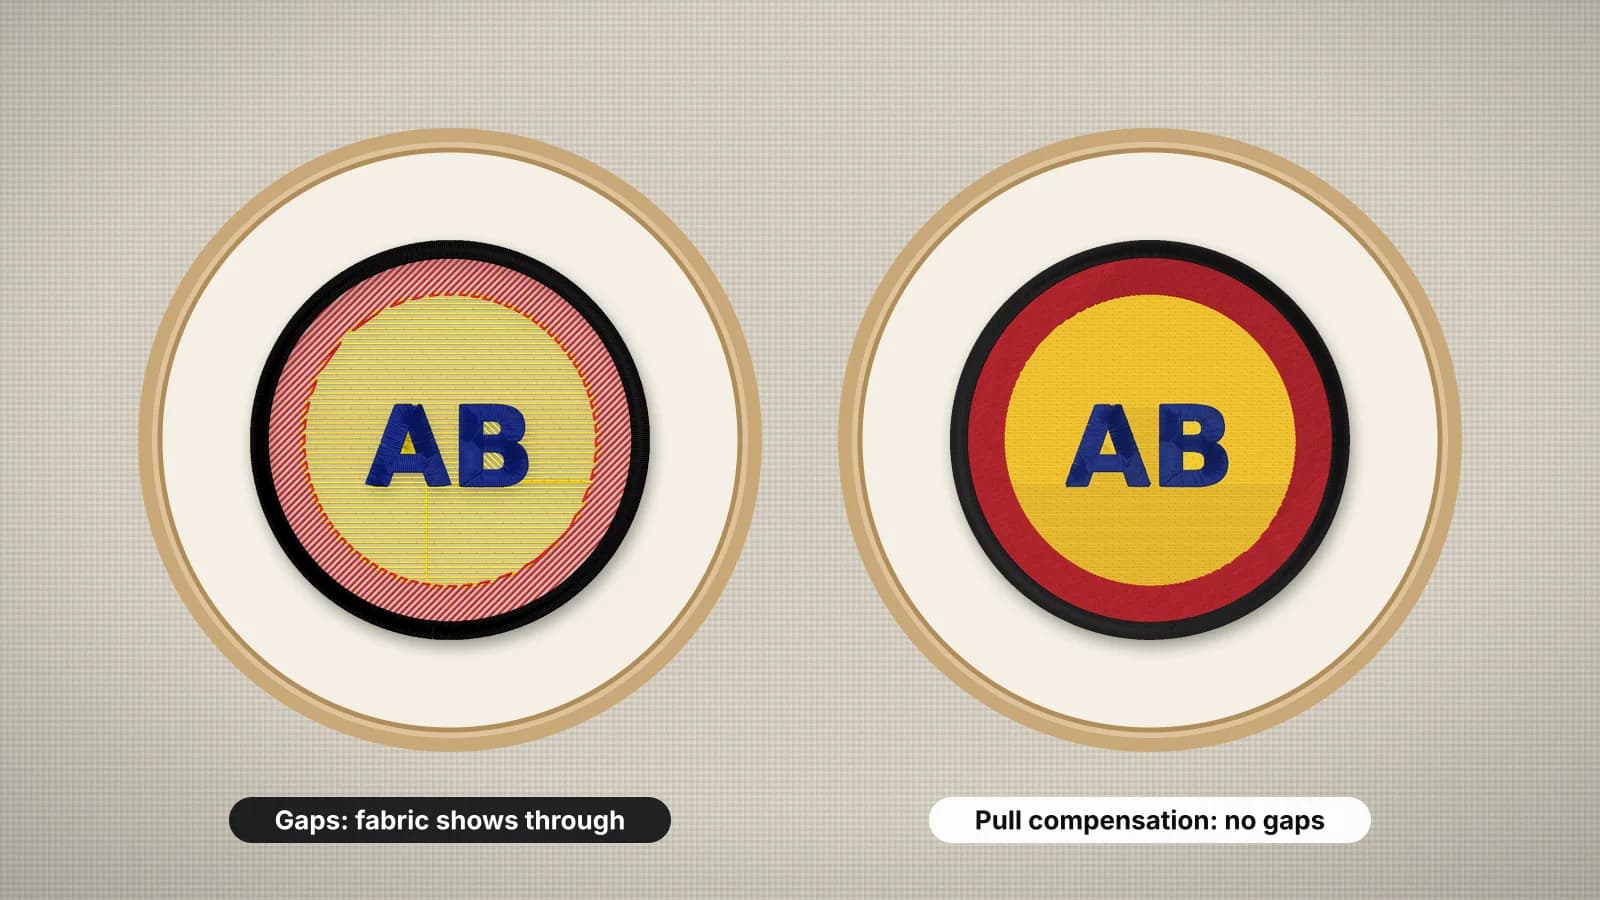
Few things spoil a design like a thin line of fabric between a fill and its outline, or a white shirt peeking through a navy fill. The stitches sewed; they just didn't land where the file said they would, or there weren't enough of them to cover the fabric.
The good news is that gaps have a short list of causes, and most are fixed in the hoop, the stabilizer or the file rather than the machine. This guide shows how to tell the kinds of gap apart, why they happen and how to fix each. For other faults, see common embroidery problems and fixes.
Which kind of gap do you have?
| What you see | What it usually means | Look first at |
|---|---|---|
| A thin line of fabric between a fill and its outline | The fill shrank as the fabric pulled in, or the outline shifted: a registration problem | Hooping, stabilizer and pull compensation |
| Gaps at the edges where the stitches end, while other edges meet | The fabric pulled in along the stitch direction, with too little compensation | Pull compensation in the file |
| Colors out of line, worse on one side of the design | The fabric moved during stitching, often because it was loose in the hoop | Hooping and stabilizer |
| Fabric showing through the fill itself | The fill is too light for the fabric, or the stitches are sinking into the pile | Density, underlay and a topping |
| Gaps on the real item but not the test piece | A different fabric or stabilizer from the one you tested on | Match the test to the real item |
Where the gap is tells you most. Gaps at the edges where stitches end point to pull; a whole design that's out of line on one side points to fabric that moved. The registration entry explains the term.
Why stitches pull the fabric and open gaps
Every stitch pulls the fabric toward itself a little. Across thousands of stitches, a fill sewn in one direction draws the fabric in along that direction, so the shape ends up narrower than it was drawn and slightly longer the other way. An outline or a neighboring color placed exactly on the original edge now misses it.
Digitizing allows for this in three ways:
- [Pull compensation](/embroidery-glossary/pull-compensation) widens each shape slightly along its stitch direction, so it shrinks back to the right size as it sews.
- Overlap extends lower colors a little under the ones on top, so a small shift doesn't open a gap. The Embrizo digitizer overlaps neighboring colors by 0.3 mm.
- [Underlay](/embroidery-glossary/underlay) stitches the fabric down to the stabilizer before the top stitches, which steadies it and reduces the pull.
Stretchy and soft fabrics pull more than firm wovens, so they need more of all three. The push compensation entry covers the other half of the effect, where shapes grow at their ends.
Try it with your own design
Sign up free, upload an image and get a stitch preview in under a minute.
Drop your image here
PNG, JPG, WebP or SVG · stays on your device
Fix it in the hoop and the stabilizer
- Hoop firmly, but don't stretch. The fabric should be smooth and taut, with no ripples, but a knit pulled tight relaxes after unhooping and opens gaps. The hooping guide shows how.
- Use cut-away on knits and stretch fabric. Tear-away weakens as the needle perforates it, and the fabric starts moving partway through the design. Cut-away holds to the end.
- Add support for dense designs. A heavier backing, or a second layer, stops a big fill dragging the fabric out of line.
- Bond slippery fabric to the stabilizer with a fusible backing or a temporary spray adhesive, so the two can't slide apart.
- Use the smallest hoop that fits. Less loose fabric round the design means less movement.
- Hoop rather than float when registration matters. Floating is handy for awkward items, but the fabric can shift more.
The stabilizer finder suggests a backing for the fabric and the design's density, and the stabilizer guide has a fabric-by-fabric chart.
When fabric shows through the fill
| Cause | Fix |
|---|---|
| Fill spacing too open for the fabric or thread | Tighten the fill density a step, for example from 0.45 mm to 0.4 mm between rows |
| Stitches sinking into towel, fleece or piqué | Add a water-soluble topping and heavier underlay |
| High-contrast thread and fabric, such as white on navy | A slightly denser fill and fuller underlay; contrast shows gaps a matching color hides |
| Finer thread than the file was made for | Sew with the 40-weight thread most files expect, or make the file denser for 60-weight |
| A stitch file enlarged after digitizing | Scaling up spreads the rows apart; digitize again at the new size |
Don't jump straight to a much denser fill: too dense brings puckering, stiffness and thread breaks instead. The density guide covers the trade-off, and the topping entry explains how a topping keeps stitches on top of the pile.
Machine checks that help
The machine is rarely the main cause of gaps, but a few things make them worse:
- Top tension too tight pulls each stitch harder and draws the fabric in more. On the back of a satin column, bobbin thread should show down roughly the middle third; see why bobbin thread shows on top.
- A hoop not fully seated on the embroidery arm can move slightly as it stitches. Check it clicks in, and that nothing is resting on it.
- Drag on the hoop. A heavy garment hanging off the table, or a sleeve folded under the hoop, stops it moving freely and shifts the registration. Support the weight and clip the rest out of the way.
- A worn or bent needle deflects on thick fabric and places stitches slightly off. Fit a fresh needle of the right size.
- Speed. On thick or very stretchy items, some embroiderers slow the machine down for better registration.
Designs that are prone to gaps
- Thin outlines round fills. A 1 mm outline has no room to hide a small shift. A slightly wider satin border, about 2–3 mm, covers small misses.
- Many separate outlined shapes on stretchy fabric. Each one is another chance to miss.
- Big solid fills on knits. The bigger the fill, the more it pulls. A lighter density, an open design or a smaller size helps.
- Small lettering with a contrasting outline. Any shift shows on tiny letters; a single color is more forgiving. The small text guide covers sizes.
Test on the real fabric. A design that registers perfectly on stable cotton twill can gap on a T-shirt, so sew your test on an offcut of the same garment with the same stabilizer.
Practice on a free design
124 ready-to-sew designs in every machine format, free with an account.


Fix it in the file, or digitize again
If the hooping is right and the gaps are still there, the file needs more allowance for the fabric. In the Embrizo digitizer:
- Pick the fabric preset that matches. The Knit and Stretch presets add more pull compensation and heavier underlay than Woven, and the fleece, towel and sweatshirt preset uses heavy underlay for pile.
- Raise pull compensation a step, for example from 0.2 to 0.3 mm, if outlines still miss their fills.
- Set underlay to Standard or Heavy, rather than Light or None, on soft fabric.
- Adjust the fill density a step at a time if fabric shows through.
- Download at the final size rather than resizing the stitch file later.
With a bought file and no artwork there's less you can change: the embroidery file checker shows density and stitch problems, and firmer hooping and stabilizer are the main fixes. For other faults, the embroidery troubleshooter narrows down the cause from a couple of questions. Digitizing and previewing are free with an account; downloading the file needs a paid plan.